

Quick Answer
What is the standard hang tag size for clothing? There is no single universal standard, but 2 × 3.5 inches (50.8 × 88.9 mm) is a common US-market option. At OriginalityPack, 50 × 100 mm is one frequently produced size. Recent projects also include 34 × 100 mm slim tags and 45 × 90 mm shaped tags. The right size depends on your artwork, garment proportions, and attachment requirements.
A size that looks balanced on a screen can feel oversized on a lightweight garment or become crowded once a price and barcode are added. Use the chart to shortlist a format, then check the layout at actual size. This guide covers the physical dimensions of paper hang tags, also called swing tags, rather than sewn-in XS/S/M/L size labels.
Hang Tag Size Chart: Compare Dimensions in Inches, Millimeters, and Centimeters
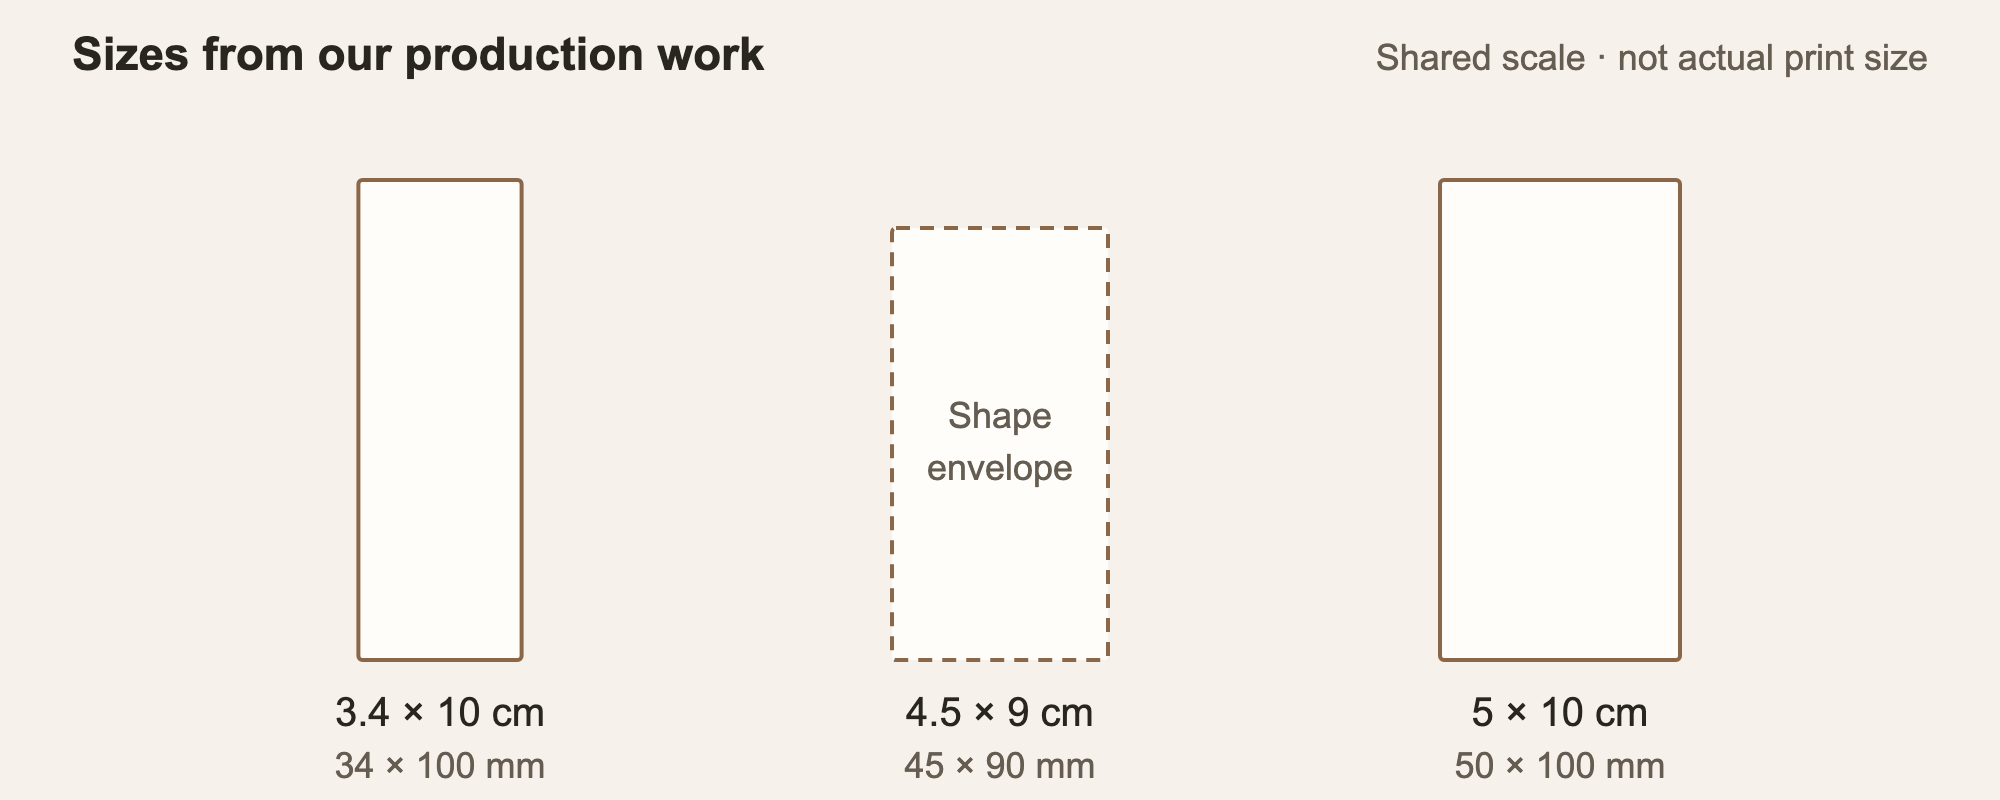
Read each dimension as finished width × finished height, with the artwork facing you in its intended hanging position. The three sizes below come from our own production work. The project descriptions identify what we have produced; the layout suggestions explain what to consider when adapting a size to your design.
Use these examples to narrow your choice, and include the exact dimensions when asking about a “standard hang tag size.” For a shaped tag, the outer width and height do not describe all the available space: the final contour must also be shown on the dieline.
| Format / production context | Inches (in) Width × height | Millimeters (mm) Width × height | Centimeters (cm) Width × height | Starting use / layout considerations |
|---|---|---|---|---|
| Slim portrait / recent project | ≈ 1.34 × 3.94 in | 34 × 100 mm | 3.4 × 10 cm | A narrow format to consider for a vertical brand layout. Place wide logos and barcodes first; the 34 mm width is the key constraint. |
| Shaped tag / recent project | ≈ 1.77 × 3.54 in | 45 × 90 mm | 4.5 × 9 cm | Consider when the outline is part of the design. Show the actual contour and hole; usable space depends on the shape. |
| Portrait / frequently produced | ≈ 1.97 × 3.94 in | 50 × 100 mm | 5 × 10 cm | A starting option for front-and-back artwork. Test the logo, product text, and actual barcode together before finalizing the layout. |
Swipe horizontally to view the full table.
Conversions use 1 in = 25.4 mm. Inch values marked ≈ are rounded to two decimal places. The original metric dimensions above should control the production brief.
Not sure which hang tag size fits your artwork?
- Send us your logo or artwork, garment type, and target quantity. We can help suggest dimensions, adjust the layout, and confirm the hole position before you finalize the size. We can also provide a dieline and arrange a sample.
In the inquiry form, describe your garment, quantity, and size question. Include a link to your logo or artwork if available.
How to Choose a Hang Tag Size for Your Clothing Line
We recommend the smallest layout that keeps the required information readable and leaves room for the attachment. Increase the size when it solves a specific content or proportion problem.
List the content before choosing the rectangle
Separate front-facing branding from the details on the reverse. Build the layout with the final logo, SKU, price, barcode, and longest text or language version you need to accommodate.
If the layout is crowded, remove repeated information or move supporting copy to the reverse before reducing every font size. Small text can look tidy in an enlarged mockup and still be difficult to read in hand.
Check the garment and display context
A compact tag may suit a small accessory where a large card would cover the product. A coat can provide room to test a taller format, but that does not make a tall tag necessary. Check where the tag rests, whether the attachment obscures the front, and whether customers can turn it over without fighting the string.
For folded garments, compare the tag with the visible presentation area. For hanging garments, use the intended attachment point and cord arrangement. A garment category alone does not determine the right size.
Choose the dimension that solves the constraint
If a wide wordmark or barcode is the problem, extra height alone will not help. If several short content blocks need separation, additional height may be useful. Keep orientation in the decision: rotating a tag changes how the artwork, hole, and garment relate, even when its total area stays the same.
Flat vs. Folded Hang Tags: Compare Finished Size and Available Space
A flat tag provides a front and back. A folded tag adds panels while keeping a smaller closed footprint, but it also adds a fold that the artwork must accommodate. Choose the structure around how the customer will read and handle the information.
We recommend a flat tag when the essential details should remain visible without opening anything. Consider a folded tag when supporting information needs additional panels. Keep details needed at checkout on an accessible face unless the retailer’s handling process allows otherwise.
Illustrative dimension example: a simple equal-panel tag that closes to 50 × 90 mm and opens sideways would have a nominal unfolded trim size of 100 × 90 mm. This calculation excludes bleed and any project-specific dieline adjustments. It is an explanation of the dimensions, not a production template or a confirmed stock format.
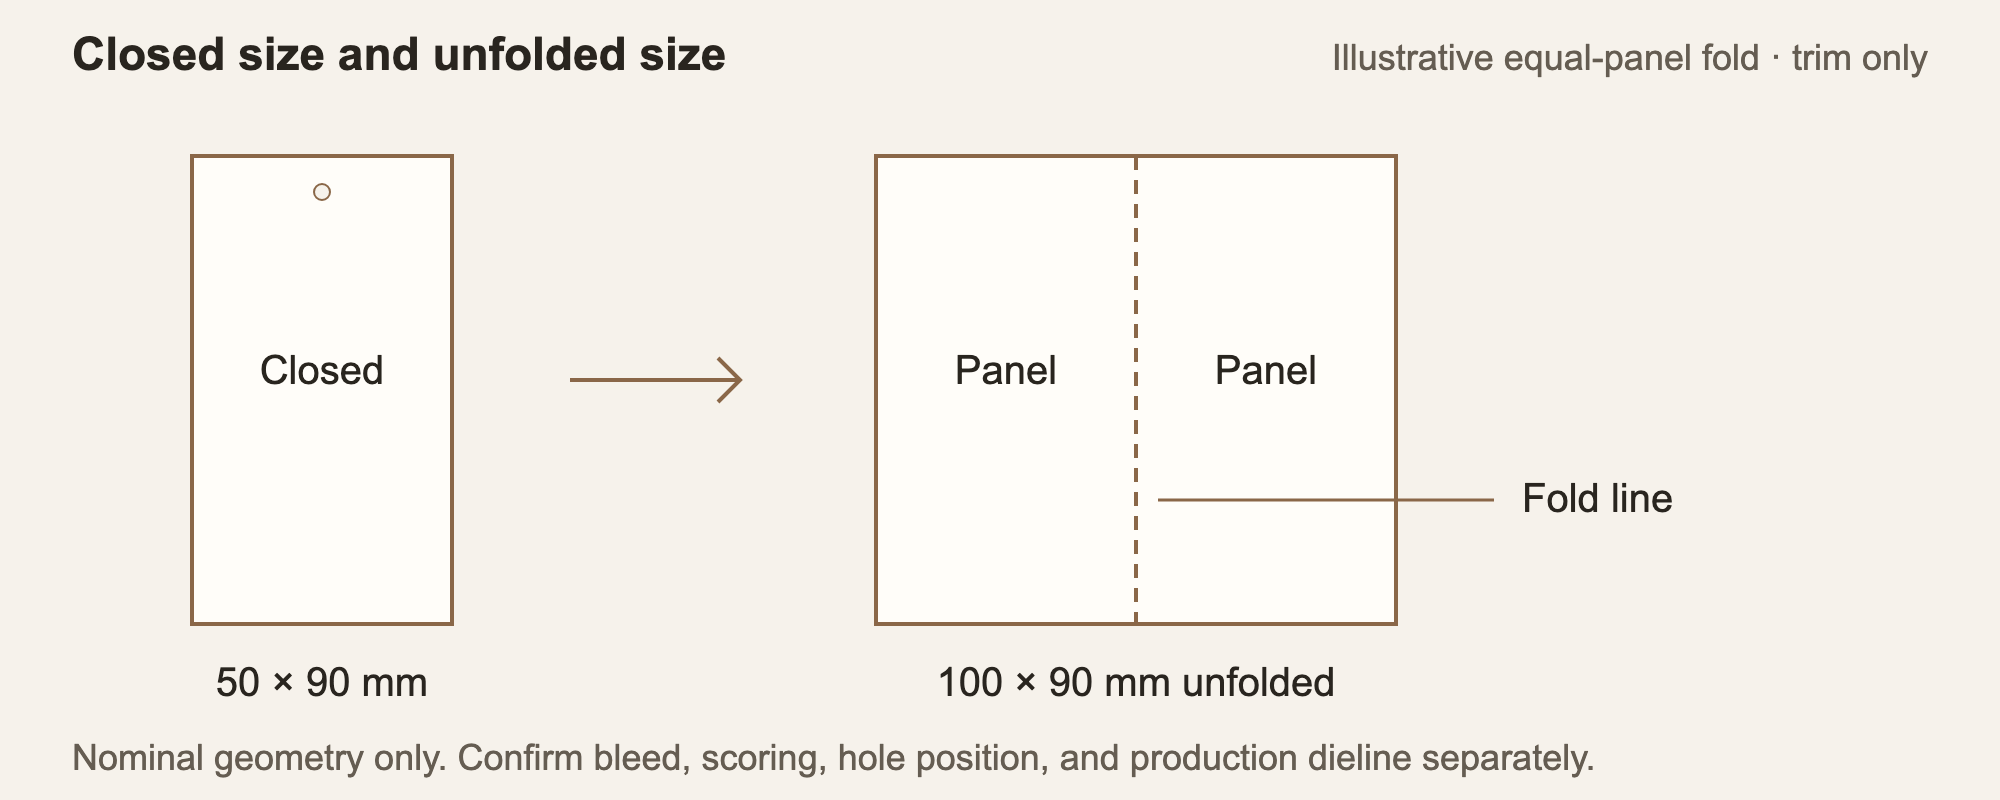
Keep critical text away from the fold, show the hole on the relevant panels, and identify the outside face. The extra panels must remain accessible after assembly.
Plan the Hole, Text, and Barcode Before Finalizing the Size
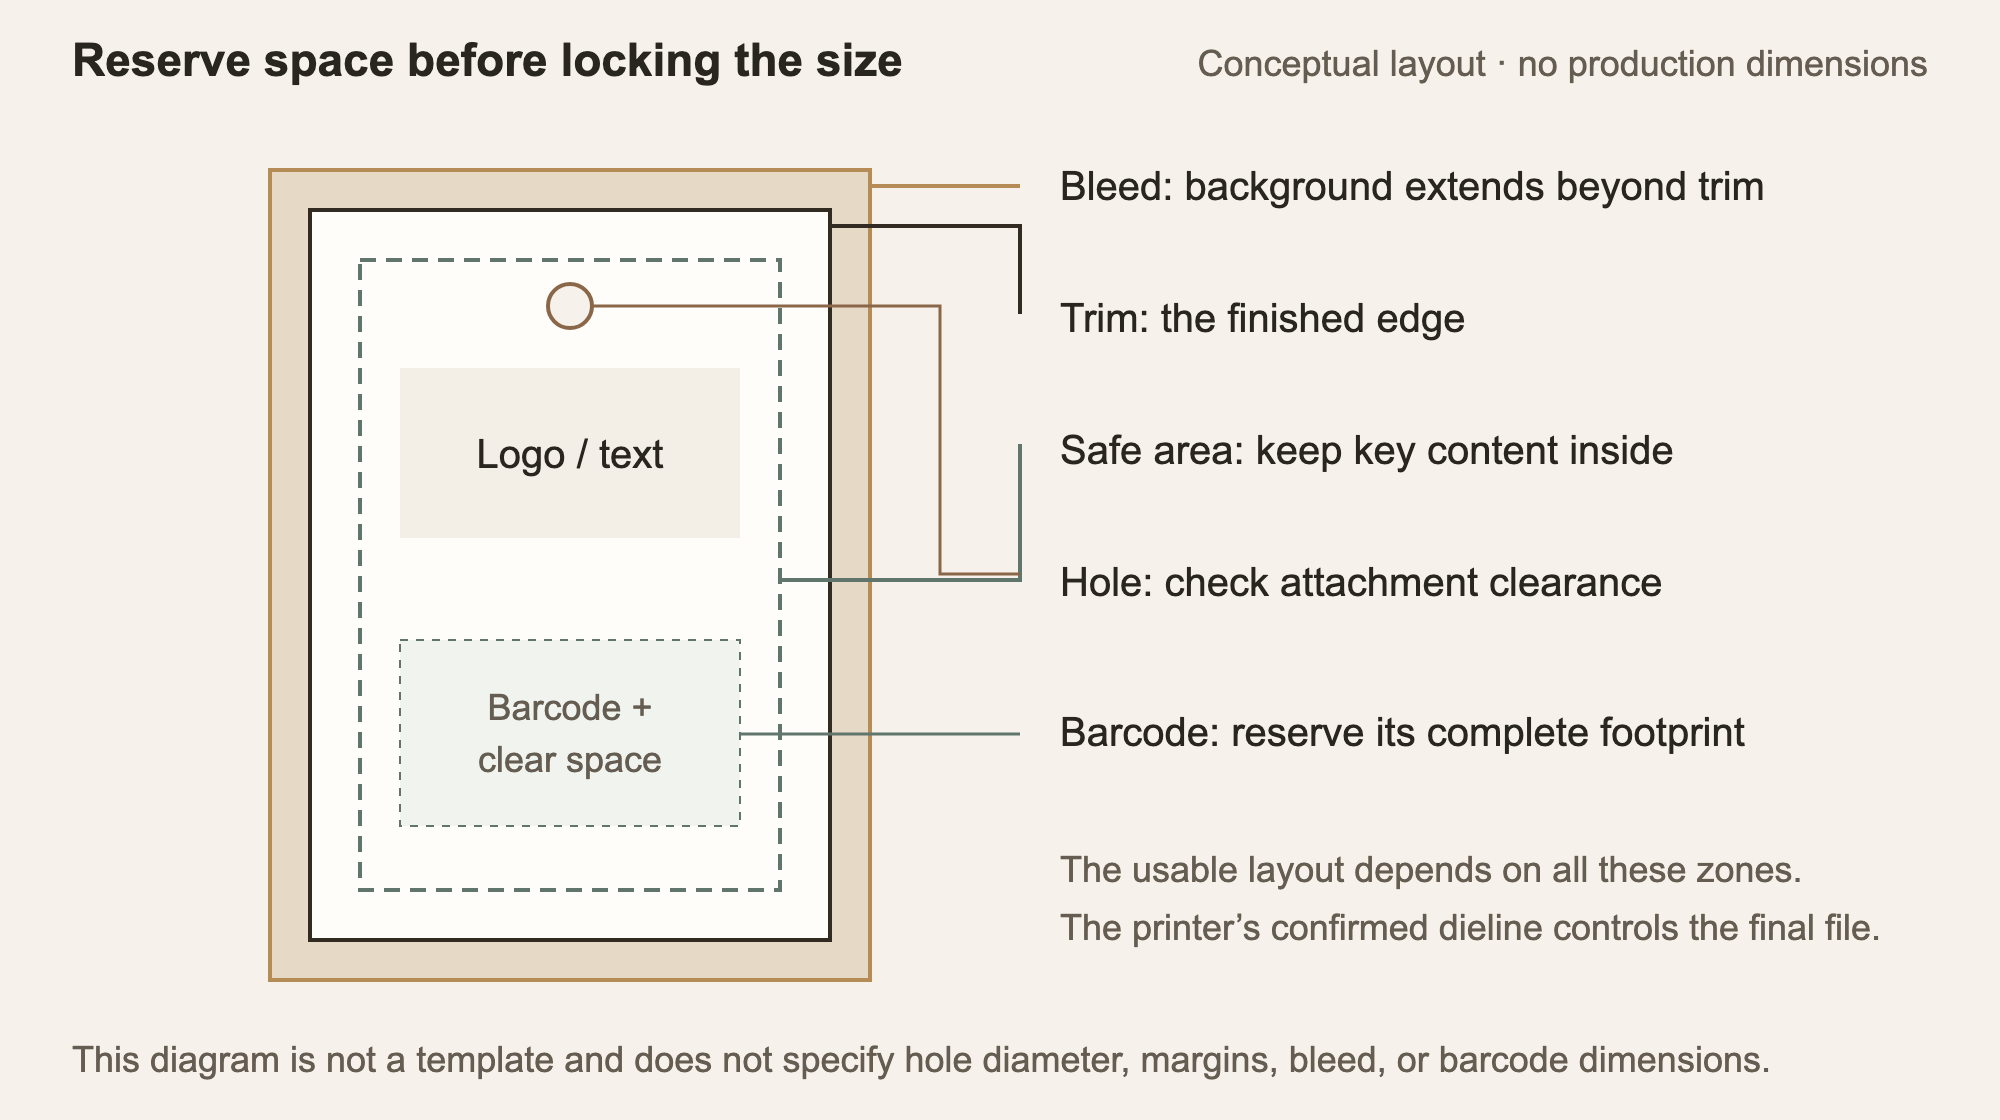
The finished outline is not all usable artwork space. Check the trim boundary, internal safety margins, attachment area, and barcode space together before locking the dimensions.
Separate finished size from artwork size
The trim line marks the finished edge. Bleed extends backgrounds beyond that edge for cutting; the safe area keeps important content inside it. For a rectangular tag with equal bleed on every side, artwork width is finished width plus twice the bleed, and the same calculation applies to height.
For initial artwork planning, allow approximately 3 mm of bleed on each edge, subject to the confirmed production dieline. A 50 × 100 mm finished tag with 3 mm bleed on all four edges needs a 56 × 106 mm artwork area. The finished tag remains 50 × 100 mm after trimming.
The calculation is (50 + 2b) × (100 + 2b) mm, where b is the bleed on each edge. Keep the finished dimensions and artwork dimensions as separate entries in the brief, and follow the confirmed dieline if its allowance differs.
Reserve the attachment area early
Review the hole and attachment together. Show the hole on both artwork views and leave room for the cord, knot, or fastener as well as the opening itself. Keep the logo and important text clear of this area.
When selecting hang strings and logo seals, check their fit against the proposed hole rather than finalizing each component independently.
Place the actual barcode instead of a placeholder
Obtain the required barcode artwork and retailer requirements before approving the tag size. GS1’s barcode quality checklist identifies symbol size, quiet zones, contrast, and bar height as checks that affect reading. A quiet zone is clear space around the symbol that must remain free of competing artwork.
Reserve the complete symbol and clear areas, away from the hole and fold. If it does not fit, compare a wider tag or a different arrangement with the responsible barcode or retail team instead of shrinking or distorting the symbol.
What We Check Before Approving a Hang Tag Size for Production
In one customer project, the artwork supplied to us did not include a hole position. Once the hole was considered, it conflicted with the logo area. We discussed the issue with the customer and adjusted the logo size. The revised design then went into production successfully.
The practical lesson is to include the attachment in the artwork review before treating the layout as finished. Here, adjusting the logo resolved the conflict. For another design, the appropriate change might be a different layout, hole position, or tag size; the complete artwork determines which option to discuss.
Check Your Hang Tag at Actual Size Before Printing
For size approval, we recommend two checks: a paper layout check for dimensions, followed by a representative physical sample for construction and print. A screen proof cannot show how the finished tag feels, hangs, or scans.
- Print at actual size. Disable “fit to page” scaling and measure the printed outline with a ruler. Cut it out and read the smallest text without enlarging it.
- Attach it to the garment. Check proportion, hanging position, access to the reverse, and interference from the string or fastener.
- Review the physical construction. On a representative sample, check the hole, attachment fit, fold if applicable, and whether content remains clear after assembly.
- Check barcode performance. Test a representative printed sample with the intended scanning setup. Follow the retailer’s verification requirements; one successful phone scan does not establish acceptance. GS1 explains barcode quality measurement for formal verification.
- Record the approved specification. Confirm finished width × height and units, orientation, hole diameter and position, artwork revision, and print sides. For folded tags, include closed size, unfolded size, and fold direction.
If you also need to decide paper, finish, string type, or ordering details, continue with the custom hang tags with string buying guide. Keep those decisions connected to the approved layout, especially when a change affects the hole, folding, or barcode surface.
Is a 2 × 3.5 inch hang tag the same as a 55 × 90 mm tag?
No. A 2 × 3.5 in tag is exactly 50.8 × 88.9 mm. The sizes are close but not identical, so the approved dieline should use one exact specification.
Does a larger hang tag always provide a better layout?
No. Extra width or height helps when it solves a specific constraint, such as barcode width or crowded content. The tag still needs to work with the garment and attachment.
Choose the size around the complete layout. Start with a practical dimension, include the attachment and actual content, and use the garment and sample to validate the result.
Ready to produce your custom hang tags?
- For custom apparel hang tags, include your finished size, estimated quantity, preferred material if known, artwork link, and delivery country in the inquiry. If you are still deciding the size, share your garment type and current design direction.
- Already have an approved dieline? Share the existing specifications for a production feasibility review.
Before arranging a sample, ask us to confirm the sample type, any charges, and timing.
Tell Us About Your Packaging Project
Share your packaging needs, and our team will recommend the right solution for your project.