
Quick Answer
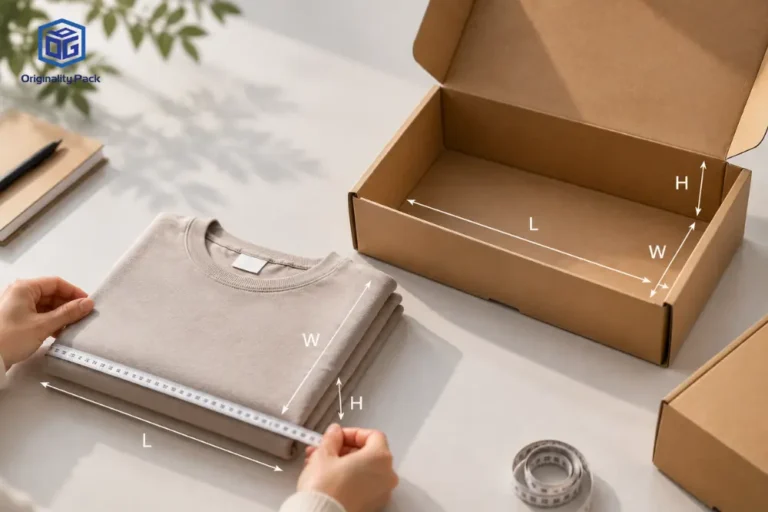
Choose custom mailer box sizes from the final packed product, not the bare item. Confirm the packing direction, then include any retail box, pouch, tissue, insert, divider, and practical packing clearance in the internal length, width, and height. After confirming product fit, check the finished external dimensions for dimensional weight, master-carton packing, and storage planning.
Table of Contents
A box that fits on a dieline can still fail during packing. Too tight, it may press the product or refuse to close. Too large, it allows movement, needs void fill, and may increase shipping cost.
The goal is the smallest practical box that packs repeatedly, closes without pressure, and provides the required protection.
Quick Size Decision: What Should Control the Box Dimensions?
| Product Situation | Measure First | Main Clearance Driver | Validate With |
|---|---|---|---|
| Folded Apparel | Final folded product stack | Variation in folded thickness | Repeated pack-out testing |
| Boxed Cosmetics | Finished retail carton | Loading clearance and corner contact | Plain packaging sample |
| Candle or Glass Jar | Product together with the insert | Impact protection and movement control | Sample tested with the final insert |
| Multi-Item Kit | Complete product arrangement | Divider clearance and product removal space | Full kit pack-out test |
Swipe horizontally to view the full table.
Start With the Final Packed Product, Not the Bare Product
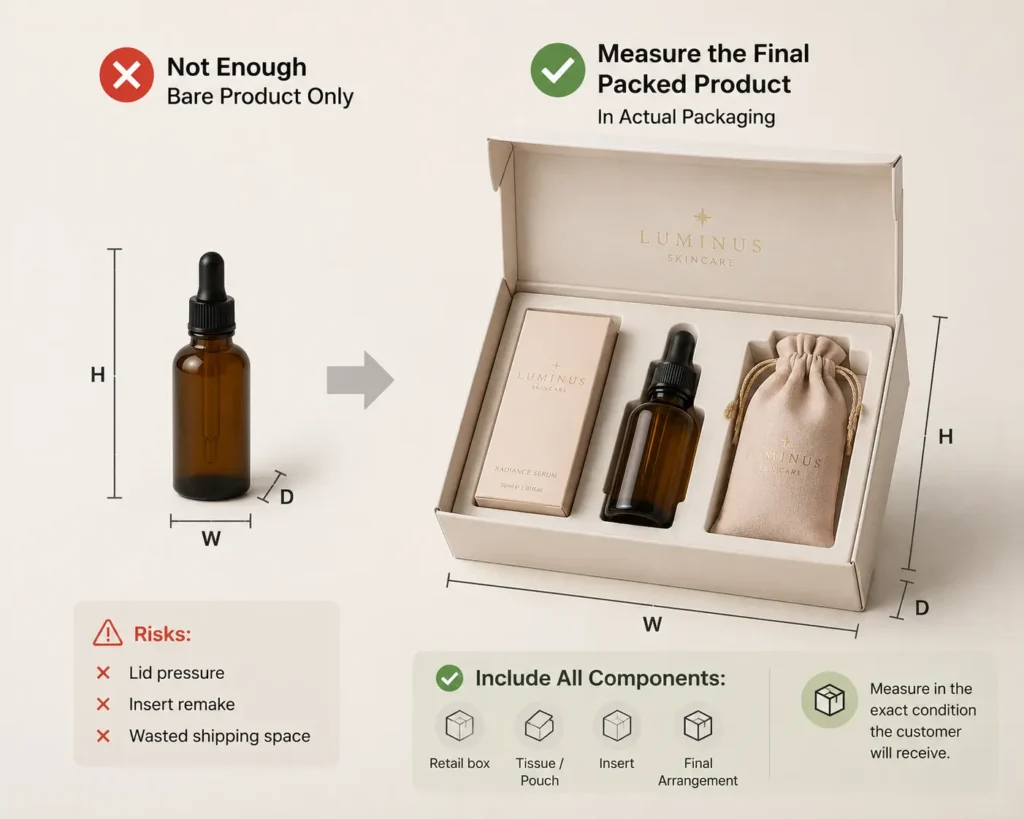
Measure the product in the exact condition and arrangement in which the customer will receive it.
Measure a candle’s retail carton rather than the jar, include a cosmetic pouch, and fold apparel using the production method— see how we approach right-sized mailer boxes for clothing brands in more detail. For kits, arrange every component first; changing orientation can alter all three dimensions.
Example: Why bare product measurements were not enough
In an anonymized skincare sizing review, the buyer supplied the bottle-set dimensions. Adding the retail cartons, tissue, and paperboard insert increased the required internal height. Confirming the final pack-out avoided lid pressure and an insert remake. The original measurement covered an incomplete packaging system. (For a closer look at skincare-specific sizing decisions, see our skincare packaging guide.)
Internal vs. External Mailer Box Dimensions: Which Should You Give the Factory?
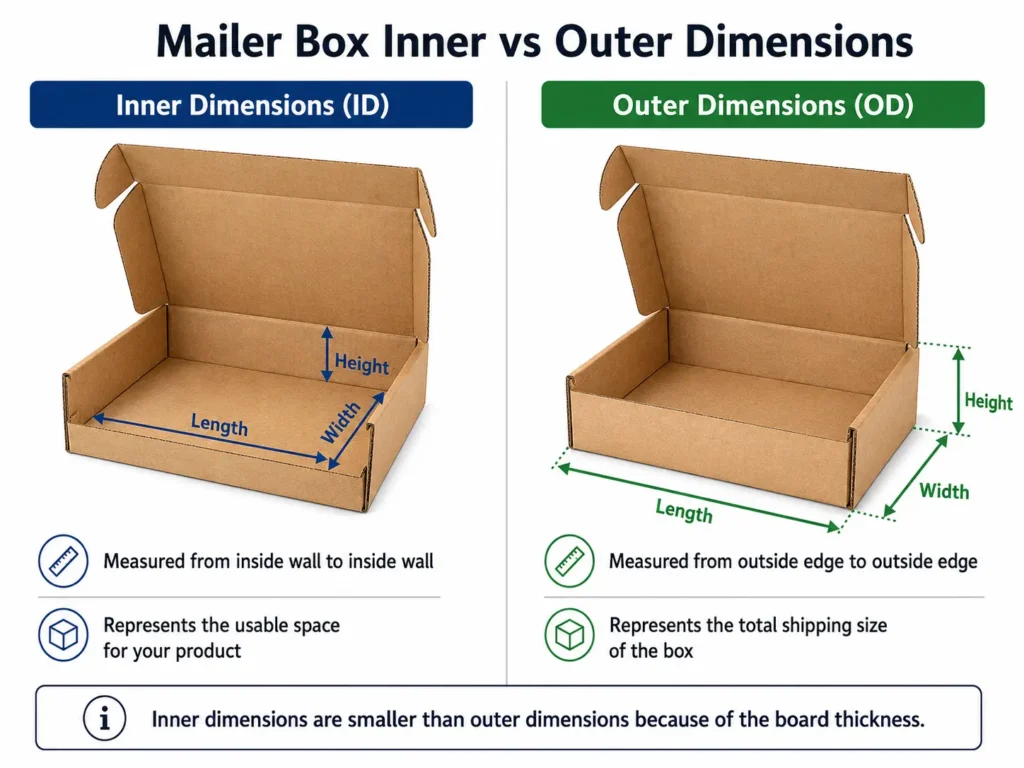
Internal mailer box dimensions describe the usable space available for the product and insert. External dimensions describe the finished outside footprint used for shipping, storage, and master-carton planning.
Write the internal size as length × width × height, or L × W × H, and label it “internal.” Corrugated board thickness, folds, and overlapping panels make the finished outside larger than the usable inside. Ask the factory to confirm both sizes after the structure and flute type are selected.
Unit note: 1 inch = 25.4 mm. When requesting a quote, use one measurement system consistently and clearly label the unit.
How to Calculate the Right Custom Mailer Box Size Step by Step
- Build the real pack-out. Include every item, wrap, insert, and card.
- Choose the orientation. Test flat, upright, or stacked arrangements.
- Measure the maximum points. Record the complete arrangement’s L × W × H.
- Add functional space. Account for protection, variation, and loading room.
- Write the target internal L × W × H. Label it clearly.
- Check the structure and sample. Confirm the dieline, external size, closure, and movement.
Suppose a finished arrangement measures 200 × 150 × 40 mm. If a physical trial shows that this product needs 6 mm of total loading clearance in length and width and 8 mm for tissue and height variation, the trial inside size becomes 206 × 156 × 48 mm. These are example assumptions, not a universal allowance.
How Much Clearance Should You Leave Around the Product?
There is no single clearance rule for every custom mailer box.
Folded apparel needs room for thickness variation. Boxed cosmetics need loading space without corner contact. Glass jars may need movement-control inserts, while jewelry often takes its final size from the insert layout.
More clearance eases packing, but too much increases movement and volume. Less clearance looks compact, but product variation becomes harder to manage. Test the smallest allowance that works across repeated pack-outs.
Design the insert before finalizing the mailer box
Insert walls, folds, finger notches, and cavities occupy space. Do not lock the box first and force the insert to fit afterward. A complex insert can improve protection, but it adds material, sampling, and packing steps.
For a full breakdown of insert materials—EVA, EPE, paperboard, corrugated, molded pulp, and thermoformed trays—see our mailer box insert guide.
Why a Slightly Larger Mailer Box Can Cost More to Ship
Shipping cost can be based on the space a parcel occupies, not only its scale weight.
For example, using a divisor of 139, a 12 × 9 × 4 inch parcel produces 3.11 lb, rounded up to 4 lb. A 13 × 10 × 5 inch parcel produces 4.68 lb, rounded up to 5 lb. If both parcels weigh only 2 lb, the larger box can still have a higher billable weight.
Should Multiple SKUs Share One Mailer Box Size?
A shared size works best when final packed dimensions are similar; large differences usually justify more than one size.
Choose Your SKU Situation
Select the scenario closest to your product range to see a practical starting option and the main operational trade-off.
Similar Packed Dimensions
One shared size
Simpler inventory
Large Variation in Height or Footprint
Two or more size groups
Better fit, but more packaging SKUs to manage
Fixed Subscription Kit
Dedicated kit size
Efficient presentation, but less flexibility
Frequently Changing Mix
Shared size with controlled inserts
Easier operations, but potentially more empty space
One size suits similar products, but not when the largest SKU forces every smaller order into an oversized parcel. Compare the inventory work of a second size with repeated void-fill and shipping costs.
For material, printing, inside print, and ordering decisions, use the complete custom mailer box packaging guide. This guide stays focused on sizing and fit.
What Should You Check Before Approving a Mailer Box Sample?
A physical pack-out test should confirm fit, closure, protection, and packing speed before mass production.
- Can the product be loaded without forcing the item or bending the box?
- Does the lid close naturally after tissue, cards, and inserts are added?
- Does the product move noticeably when the closed box is handled?
- Do external dimensions still match shipping and master-carton plans?
A plain structural sample answers these questions before printed production. Include it in the custom packaging production timeline instead of approving the dieline at the last minute.
Common Mailer Box Sizing Mistakes That Cause Rework or Higher Costs
Measuring the bare product. The sample becomes too tight after retail packaging, tissue, or cards are added.
Not labeling dimensions. Buyer and factory may work from different internal and external assumptions.
Matching the product exactly. A technical fit on paper may be too tight for repeatable packing.
Using one universal allowance. Clearance for folded clothing may be wrong for glass or a fitted insert.
Finalizing the box before the insert. The insert may lose wall strength or removal space.
What Size Information Should You Send Before Requesting a Quote?
Use this sizing brief when requesting a custom corrugated mailer box quote:
If you’re an apparel brand, our clothing packaging quote checklist covers additional details specific to garment packaging.
Mailer Box Requirement Checklist
- Final packed product size and weight
- Measurement unit (mm or inches)
- Packing orientation
- Products per box
- Retail box, pouch, or tissue packaging
- Insert and protection requirements
- Target internal size, if known
- SKU quantities
- Delivery country and intended shipping method
- Artwork or dieline status
Not sure about the final dimensions? Final dimensions are not required. You can start with packed product measurements, photos, quantity, and insert requirements. Originality Pack can review the packed arrangement, internal target size, insert space, and external shipping size before sampling. If a mailer is not suitable, compare other custom paper box structures, or see how corrugated mailer boxes, rigid boxes, and poly mailers compare, rather than forcing one format.
FAQ: Custom Mailer Box Sizes and Dimensions
Custom mailer box factories normally specify internal L × W × H because these dimensions define the usable product and insert space. Request the finished external dimensions separately for dimensional weight, storage, and master-carton calculations.
A custom mailer box should not use one universal clearance allowance. The required extra space depends on product variation, packing speed, insert walls, protective materials, fragility, and how easily the customer must remove the product.
Measure the final packed product after adding planned tissue, pouches, sleeves, retail cartons, inserts, and cards. These components can change the required internal length, width, or height.
Yes. Corrugated board thickness, folded sidewalls, and overlapping panels increase the finished external dimensions beyond the internal usable dimensions.
Several products can share one custom mailer box when their final packed dimensions are similar or controlled inserts hold smaller products securely. Large size differences may justify two or more mailer sizes.
Yes. A physical structural sample reveals loading resistance, lid pressure, product movement, removal space, and finished external dimensions that a digital dieline cannot confirm.
Conclusion: Choose the Smallest Size That Packs and Protects Reliably
Define the final packed arrangement and internal L × W × H, then review the external shipping size. Choose the smallest size that packs and closes reliably, and confirm it with the real product in a physical sample.